


The robins I mentioned earlier this week seem to have finally given up building their nest on our deck lamp - I sprayed it with some disinfectant, and maybe the smell scared them off? Or maybe they found somewhere else to build their nest, where it would actually stay put. I'll be scrubbing the lamp down this weekend if they've stayed away. It's pretty messy, but I didn't see the point in making it shine if they were just going to return the next day. I've been cleaning the deck and railing almost daily already.
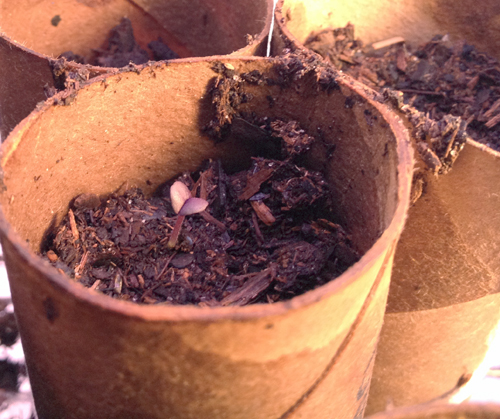
Indoors, we're starting our seeds in toilet paper tubes, like I mentioned in our gardening budget post. The cardboard can either be peeled away or will decompose when these are planted. So far, they are working great. We have a few tomato and basil plants starting! Here is the dark opal basil sprout - it's purple!
How To Make Toilet Paper Tube Seed Starters
You will need:
Cardboard tubes
Twine or string
Drip tray or plate
Permanent marker
Potting soil or seed starting mix
Water
Seeds
Directions:
1. Collect however many toilet paper tubes you would like to use. You might also be able to cut up paper towel or wrapping paper tubes.
2. Write the name of the seed you are planting on the side of the tube in permanent marker (it will get wet!). Use your twine to tie the tubes together in bunches of 3 or so, with the labeled sides facing out. Arrange the tubes standing up on a drip tray.
3. Fill each tube with moistened potting soil to within 1/2 inch or so of the top.
4. Plant the appropriate seed in each tube. You can use one or two seeds per tube, but you ultimately only want one plant - if two sprout, you'll just pull one.
5. Water the tubes daily (use a spray bottle if you have it). Keep the soil moist, and soon you will see sprouts starting! Move the seedlings to a sunny windowsill or a grow light. Continue watering regularly until the plants are the size you want for transplant, or the risk of frost is sufficiently past.
We haven't transplanted these outdoors yet (of course), but I don't think they'll give us any trouble when we do. Make sure you label your plants - I wrote on the tubes, but you can use plant markers if you like. Seedlings are quite hard to tell apart!
You are such a trooper, Grace. So glad things are growing well for you :)
ReplyDeleteEverything seems to be going much more smoothly than expected so far! So, here's hoping that continues :)
Delete