
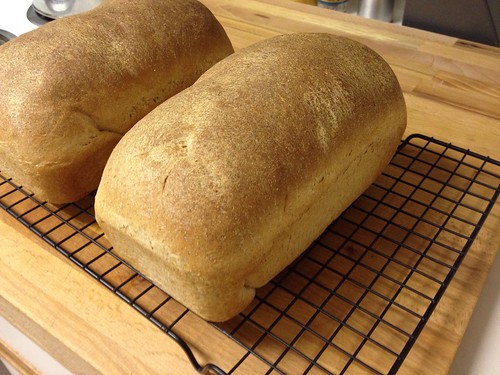
This whole wheat sandwich loaf is our basic, go-to bread recipe. The loaves are dense enough to support a sandwich, but not as dense as all whole-wheat loaves. The bread is lightly sweet and has just the right amount of moisture. It slices well, keeps on the counter without a problem, and toasts perfectly. I like to make this on a Saturday or Sunday afternoon, while we're doing various chores and errands that don't keep us away from home for too long.
Although the process takes a while to complete, with several rises, I don't consider it time-consuming. That's because most of the time it takes is down-time – you need a minute or so of work, then you leave it be for another hour. Easy. And bread making is one of the most rewarding cooking tasks for me, personally. There's something about slicing into a fresh loaf you made with your own hands that is incredibly satisfying. If you have never made bread before, I highly recommend you try it, at least once. If the smell of fresh-baking bread filling your home isn't enough motivation, think of how proud you'll feel after accomplishing this "difficult" task.

I adapted this recipe from Joy of Cooking, in the interest of full disclosure. Their original recipe, as written, did not work at all for me (it was extremely dry!!!), and so I adapted it to suit my tastes (and to actually make bread, rather than a dry, floury mess). Their recipes usually work for me, and although this one did not, I like my adapted version a lot. So I suppose it all works out in the end.

Whole Wheat Sandwich Bread
This recipe uses part whole wheat flour and part white flour to keep the texture of the bread lighter. It is ideal for slicing for sandwiches or toast and keeps well on the counter.
Yield: 2 9x5 inch loaves
This recipe uses part whole wheat flour and part white flour to keep the texture of the bread lighter. It is ideal for slicing for sandwiches or toast and keeps well on the counter.
Yield: 2 9x5 inch loaves
INGREDIENTS
1 ½ tbsp active dry yeast (2 packets, or 4 ½ tsp)
1 – 1 ¼ cup warm water
1 cup milk
2 tbsp butter
2 tbsp maple syrup (or honey)
1 tbsp salt
2 cups whole wheat bread flour
3-4 cups bread flour
1 ½ tbsp active dry yeast (2 packets, or 4 ½ tsp)
1 – 1 ¼ cup warm water
1 cup milk
2 tbsp butter
2 tbsp maple syrup (or honey)
1 tbsp salt
2 cups whole wheat bread flour
3-4 cups bread flour
DIRECTIONS
1. Combine 1 cup water and yeast in a large mixing bowl (or the bowl of your stand mixer, if you plan to use it for making the dough). Set aside.
2. Combine milk, butter, maple syrup (or honey) and salt in a measuring cup. Microwave for 1 minute, stir well, then microwave about 20 seconds longer, until the butter is just melted and the liquid is warm (105-115 degrees Fahrenheit). Stir into the yeast mixture.
3. Stir in the two cups of whole wheat flour to the liquids, then add 3 cups of the bread flour. Continue working the dough until the flour is absorbed. You want the dough dry enough that it does not stick to your hands or the bowl, but wet enough that it sticks to itself and incorporates all of the flour. At some point, you’ll need to switch to your hands to work the flour into the dough. If the dough has not reached this consistency, add either more flour (if too wet) or water (if too dry) one tablespoon at a time, to achieve the correct consistency. Knead the dough for about 5 minutes.
4. Place the dough in a large oiled mixing bowl, flipping once (so both sides get some oil on them) and cover with plastic wrap. Let rise in a warm place for about an hour, until approximately doubled in size. (The top of the refrigerator is a great place to let dough rise.)
5. Once the dough has doubled, punch it down and let it rise another hour (in the same bowl, still covered with plastic wrap).
6. After the second rise, punch down the dough again, and divide it in two. Spray two 9x5 inch loaf pans with cooking spray. Take one half of the dough and flatten it into a rectangle with your hands. Tightly roll it along the long side (so you get a long and skinny roll, not a short and fat roll), and tuck then ends under to form a little loaf shape. Place in the pan, spray or brush the top with a bit of oil, and repeat with the other half of the dough. Cover the loaves with a clean dish towel, and let rise until doubled again, 20-45 minutes.
7. While the dough rises, preheat the oven to 450 degrees Fahrenheit (425 if using glass or dark metal pans). 8. When the dough has doubled, place the pans in the oven (uncovered). Bake 10 minutes, then reduce the heat to 350 degrees (325 if using glass or dark metal pans) and bake 25-30 minutes longer. The crust should be golden brown, and the loaves sound hollow when tapped when the bread is done baking.
9. Remove the pans from the oven, and remove the loaves from the pans. Place the loaves on wire racks to cool completely. Store in an airtight container (I use gallon-size baggies). You can freeze a loaf, sliced or unsliced, to keep fresh if you won’t go through them very quickly.
No comments:
Post a Comment