Monday, April 30, 2012

Butter and Honey Kamut Muffins

First, BIG NEWS EVERYONE! (Ok, not so much big, but still exciting.) What Grace Cooked is now on Facebook - head over there and "like" the page to keep up with new posts, see photos, and more! 

Although I typically share an entree recipe on Mondays, today I couldn't wait to share these muffins. They're vegetarian (but not vegan), so I suppose they still fit the bill!
Kamut is the brand name for khorasan wheat, an ancient grain that has been revived in modern times. The story of this wheat is pretty remarkable - it dates to ancient Egypt. Beyond it's interesting history though, kamut boasts a different flavor from standard wheat. It is buttery tasting, rather than the nutty, wheat-y flavor we're used to. And it's supposed to be easier on the digestive system. It also lends a beautiful golden color to baked goods.

That buttery flavor where these muffins get their name. They're not made with a ton of butter, and have just enough honey to make them perfectly sweet, but the buttery taste of kamut takes both of those flavors to a new level. The kamut makes the muffins dense and moist, with none of the dryness sometimes associated with whole grain baked goods. These muffins taste like a total indulgence, but are really a reasonable choice.

I used Bob's Red Mill whole grain kamut flour and kamut hot cereal. I imagine variations on these muffins could be made with a variety of other flours and cereals - I'm thinking whole wheat and oatmeal or spelt and spelt flakes as an option. But the kamut really makes the flavor of these muffins special.

Although you could certainly top these muffins with butter and honey, I think that would be over-kill in this case. They taste wonderfully rich just as they are.

Butter and Honey Kamut Muffins
I use a combination of milk and vinegar here, but you could substitute an equal amount of buttermilk or soured milk if you like. This recipe was inspired by Pharaoh's Muffins, from the kamut cereal package.  
Yield: 12 muffins

INGREDIENTS
1 cup kamut hot cereal
1 1/4 cup milk
1 tbsp white vinegar
1/2 cup honey
1/4 cup butter, softened
1 egg
1 tsp salt
1 tsp baking powder
1 tsp baking soda
1 cup whole grain kamut flour

DIRECTIONS
1. Combine kamut cereal, milk, and vinegar in a bowl and stir to combine. Set aside.
2. Preheat oven to 400 degrees Fahrenheit. Line a 12-cup muffin tray with papers, or grease.
3. Stir together butter, honey, and egg until combined. Stir in all remaining ingredients and kamut-milk mixture. Spoon into prepared muffin tin.
4. Bake for 12-15 minutes, until golden brown. Remove from pan and cool completely on a wire rack.

Like what you read? Subscribe to the feed in your favorite feed reader, ****like me on Facebook****, or follow me on Twitter to keep up with new posts! 

Friday, April 27, 2012

Container Gardening: April Update

 We've started the first of our outdoor gardening containers this week! I had hoped to start early this year, because we had such a warm spring, but the last few weeks have been much more typical weather which included a few drops below freezing. So it turned out to be a good thing that I was too busy to start earlier.

We prepared our buckets by drilling some holes in the bottom for drainage.  Nick was in charge of the power tools here:

And I planted our herbs, lettuces, and carrots. I haven't planted the basil yet. The other plants will wait a few more weeks until it gets a bit warmer. The butter lettuce and tom thumb lettuce have started to sprout (I'll have to thin them very soon!), and the kale and spinach are still doing well. 

That means the following things have been planted:
  • Carrots
  • Tom Thumb Lettuce (sprouting)
  • Buttercrunch Lettuce (sprouting)
  • Spinach (early April, sprouted)
  • Swiss Chard (transplanted)
  • Kale (early April, sprouted)
  • Mint (some transplanted)
  • Dill
  • Chives (some transplanted)
  • Parsley (a few more seeds added)

And the follwing have yet to be planted outdoors:
  • Tomato (seedling started)
  • Peppers (seedling started)
  • Eggplant (seed planted, but no seedlings yet...)
  • Basils (some seedlings started)
  • Cilantro (I swear this stuff hates me)
  • Squashes
  • Beans

I transplanted the swiss chard that we had growing in our windowsill garden rather than starting it over from seed. Unfortunately, it had started to look a bit rough because it seriously outgrew the 6 inch pot it was planted in, but I'm hoping it will recover in its new, much larger pot. I also transplanted the mint and chives; they haven't died on me yet, but we'll see how well they withstood the move after another week or so I think. I love all of the colors of the rainbow chard!
None of the plants are in their final position yet; we'll have to move them all around (and set out the shelving unit) when I plant the remaining ones. In any case, so far, so good!

Like what you read? Subscribe to the feed in your favorite feed reader, or follow me on Twitter to keep up with new posts!

Monday, April 23, 2012

Meatless Mondays: Moroccan Mint Tofu

I know some of you are thinking "great, tofu." It's one of those foods that a lot of folks love to hate - even some who haven't ever tasted it.  If you haven't tried tofu, I'd encourage you to give it a go. I've discussed tofu before, but the basic argument is that it makes a great platform for whatever flavors you like. Here, it gets a moroccan inspired spice rub, and then is simply broiled. Because it's pressed, the texture is crispy on the outside and chewy on the inside. This is a fast, easy, tasty way to get plenty of vegetarian protein.

If tofu isn't your thing, I'll be writing more about gardening later this week - we're starting to move more things outdoors, and I'm really excited! I've got one tomato seedling and one pepper seedling doing pretty well indoors, and they'll stay inside for another week or two until it gets a bit warmer. I still haven't got any of my eggplant seeds to start - I might try planting a few more seeds (in our seed starters) to get one going.

Those pesky robins continue to plague our deck. I haven't managed to completely dissuade them from building a nest on our lamp...they're apparently not very bright. I'm trying to keep an eye on things and make sure none of the neighborhood birds are after our seeds or seedlings - there are a lot of birds around right now!

 This recipe is vegan, and high in protein! If you're in a rush, you could press the tofu for as little as 15 minutes, and have this dish fully prepared in about 30 minutes. If you have time, pressing for the 30 minutes I suggest will give you a slightly better texture. We enjoyed this with some baked mushrooms (just spray them with a bit of cooking spray, and bake or broil until they look delicious).

Moroccan Mint Tofu
The rub I use in this recipe was inspired by 101 Cookbooks. Feel free to add some cayenne to the mix if you want your tofu spicy.
Yield: 2 servings

INGREDIENTS
1 block firm or extra firm tofu, sliced into 8 pieces and pressed*
2 tbsp olive oil
1 1/2 tsp dried mint
1 tsp ancho chili powder
1/2 tsp cumin
1/2 tsp cinnamon
1 tsp ground ginger
1 tsp salt

DIRECTIONS
*To press tofu, lay the slices in a single layer on a folded clean kitchen towel and cover with another folded towel. Place a baking sheet on top of the towels, and place some heavy objects (cookbooks work well) on top of the baking sheet. Press for 30 minutes or so.
1. Preheat the broiler (high). Line a baking sheet with parchment or a silpat.
2. Optionally, combine all spices and salt in a mortar and pestle. Grind until you have a fine, uniform powder.
3. Stir together oil and spices in a medium mixing bowl.
4. Cut pressed tofu slices in half and gently toss with oil and spice mixture. Arrange in a single layer on the prepared baking sheet.
5. Broil for 4-5 minutes, flip, then broil the other side 4-5 minutes, until tofu begins to turn golden. Enjoy!

Like what you read? Subscribe to the feed in your favorite feed reader, or follow me on Twitter to keep up with new posts!

Wednesday, April 18, 2012

Rainbow Carrot Salad

It's been a few days since I posted anything new. I was out of town this past weekend for a family member's funeral, so I didn't have time to cook anything, and frankly didn't feel like cooking anything for a few days. I'm getting back into the swing of things now, and I plan to resume my regular posting. I hope you didn't miss me too much!

This isn't a new recipe - it's my simple carrot salad, that I posted back in January. Then, it was a great way to bring freshness and sunshine to the dark winter. Now, it's a celebration of springtime. I used parsley instead of basil this time and rainbow carrots in place of regular orange ones. The flavor isn't remarkably different, but it is certainly visually interesting! The beautiful purple carrots have yellow or orange centers, providing a great mix of colors in the salad.


When I found these beautiful rainbow carrots at the store, I knew I had to make something with them that was simple- something that would really showcase the carrots. I considered roasting them (like these carrots and parsnips), but decided that this unfussy, raw salad was more in the spirit of the season.

So, although this isn't a new recipe, it's one worth repeating. And rainbow carrots are a great way to dress it up! 

Rainbow Carrot Salad
This is the same recipe as Simple Carrot Salad, and you can of course make this with regular orange carrots. As before, use any combination of basil, parsley, and mint that you like - whatever you can get fresh.
Yield: about 4 cups, enough to serve 8 as a side dish

INGREDIENTS
4 cups grated rainbow carrots
 Zest and juice of one whole lemon
2 tbsp olive oil
1/2 tsp ground coriander
pinch of salt
2 tbsp chopped fresh parsley (or more, to taste)
2 tsp honey
DIRECTIONS
1. Combine all ingredients in a bowl.  Stir, cover, and refrigerate for an hour or more.
2. Serve and enjoy! Refrigerate leftovers.


Like what you read? Subscribe to the feed in your favorite feed reader, or follow me on Twitter to keep up with new posts!

Thursday, April 12, 2012

Lavender Lemonade

 As the weather warms, a cool drink becomes more and more of a necessity. Although it hasn't been so balmy the past few days, the weather is certainly warming up. And as much as I like iced tea - unsweetened, because I'm a northerner like that - sometimes you need something a little fancier. A little more special. That's where this lemonade comes in. Perfect to serve to company on a warm afternoon, or just as a treat for yourself any old time, it's a subtle twist on an old favorite.

At first glance, it looks like pink lemonade. But this is better - more exciting, and more delicious. Infused with lavender, the lemonade takes on a pale pink-purple color.


The recipe is only a bit more complicated than making regular lemonade. To infuse the lavender flavor, you make a lavender simple syrup, and let the lavender steep before straining it out. What you're left with is a lemonade worthy of an Occasion. Or any occasion.

Lavender Lemonade
Yield: about 2 1/2 quarts

INGREDIENTS
2 cups sugar
2 tbsp plus 2 tsp dried lavender flowers
10 cups water, divided
8 lemons, plus slices to serve

DIRECTIONS
1. Combine sugar, lavender, and 2 cups water in a sauce pan over medium heat. Stir until sugar is dissolved, and mixture just reaches a simmer. Remove from heat and let sit for 30 minutes.
2. Meanwhile, juice the lemons and strain the juice into a large pitcher (or have multiple pitchers).  Add the remaining water and stir to combine.
3. When the lavender syrup is done steeping, strain the syrup through a mesh strainer into the pitcher and stir.
4. Serve chilled, in glasses with a slice of lemon on the bottom (it will float when the glass is filled with liquid).

Like what you read? Subscribe to the feed in your favorite feed reader, or follow me on Twitter to keep up with new posts!

Tuesday, April 10, 2012

Applesauce Pecan Bread

Our spring weather has hit a bit of a snag - with temperatures dropping to freezing last night, I had to bring the more delicate plants inside. It's going to be a bit chilly today, but it should warm back up pretty quickly. In anticipation, I'm getting things together for a few more outdoor plantings. Even though I know harvest is a long ways off, each day I grow more eager for harvest time. For now, I have to console myself with baking bread. And that's how this hearty loaf was born. 

This is a quick bread, meaning it's not yeast-raised so there is no rising time. It's sweet, but not overly so, and heavily studded with nuts and raisins. And between whole wheat flour, honey for sweetness, and only a bit of butter, it's not so bad in the health department either.

I like a slice of this bread, warmed for a few seconds in the microwave, with my coffee.  It's dense and not overly moist (like some banana breads can be), so it's fairly sturdy.You can see how many nuts and raisins there are from these pictures - trust me, this bread does not skimp on flavor!


Keep this loaf in the fridge, and it will easily keep a week or more. The aroma of the spices as this bakes are truly heavenly - it's worth making just to fill the house with that smell.

Applesauce Pecan Bread
Yield: 1 loaf

INGREDIENTS
1 large egg
1 cup unsweetened applesauce
1/4 cup melted butter
1/2 cup honey
2 cups whole wheat flour
2 tsp baking powder
3/4 tsp salt
1/2 tsp baking soda
1/2 tsp cinnamon
1 tsp nutmeg
1/2 cup raisins
1 cup pecans, coarsely chopped

DIRECTIONS
1. Preheat oven to 350 degrees. Spray a 9"x5" loaf pan with nonstick spray.
2. Combine egg, applesauce, butter, and honey in a medium bowl and stir to combine. In a large bowl, combine flour, salt, baking powder, baking soda, cinnamon and nutmeg and stir to combine.
3. Stir the wet ingredients into the dry ingredients until just combined. Fold in raisins and pecans.
4. Bake for one hour, or until a knife inserted in the center comes out clean. Remove bread from pan to a wire rack to cool completely.

Like what you read? Subscribe to the feed in your favorite feed reader, or follow me on Twitter to keep up with new posts!

Monday, April 9, 2012

Meatless Mondays: Thai Coconut Mushroom Soup

I haven't posted a soup in a few weeks, even though I eat soup often.  Today, I wanted to share this delicious soup with you. It took me some time to figure out how to describe it. It is a very flavorful soup, with hints of ginger, citrus, mushroom, and coconut, but it is not assertive. There's no "kick in the mouth" about this soup - it's gently delicious.  Of course, you can make it quite spicy if you like, but I kept mine mild.

This soup starts with a simple lemongrass stock. It can be made ahead of time and refrigerated or frozen. The soup is quite simple, and takes less than 10 minutes to put together (once the stock is made). It would take less than an hour to make both the stock and the soup. If you want to make this on a weeknight, but are usually pressed for time, make the stock on the weekend and you'll have a very quick dinner later in the week.

This soup photographed really well, I think. But here's a secret: in person, it's a lot more...neon. Blame the turmeric combined with the slightly green stock, but it's an almost hilariously day-glow bright soup. Somehow, that just didn't translate to the photos (not that I mind!).
The soup and stock are both vegan.
Lemongrass Stock
Yield: about 1 quart of stock

INGREDIENTS
3 fresh lemongrass stalks,  roughly chopped
1 onion, peeled and roughly chopped
2 medium carrots, chopped
2-inch piece of ginger root, peeled and sliced
1/2 tsp whole peppercorns
1/2 tsp salt
6 cups water

DIRECTIONS
1. Combine all ingredients in a stock pot over high heat. Bring to a boil, then reduce heat and simmer 35 minutes.
2. Place a strainer over a large bowl, and strain out the vegetables. Use immediately, or refrigerate or freeze the stock for later use.


Thai Coconut Mushroom Soup
Yield: 4 servings

INGREDIENTS
1 recipe Lemongrass Stock (about 4 cups)
Juice of one lime
1 14.5 oz can coconut milk (light or regular)
pinch cayenne pepper (or to taste)
1/2 tsp turmeric
1/4 tsp coriander
1/2 block of tofu, about 6 oz, cut into bite-sized pieces
1 cup shitake mushrooms, sliced
1 tbsp chopped fresh herbs - cilantro, thai basil, or parsley work well
1 tsp salt, or to taste

DIRECTIONS
1. Combine stock, lime juice, and coconut milk in a pot over high heat. Stir in cayenne, turmeric, and coriander. Bring to a boil, then reduce heat to simmer and add tofu and mushrooms.
2. Simmer 5 minutes or so, then stir in fresh herbs and salt. Taste and adjust salt and heat to your preference.

We enjoyed this soup with some quick naan for dipping. This simple soup is one we'll be making again - I've been contemplating a chicken version too.

Like what you read? Subscribe to the feed in your favorite feed reader, or follow me on Twitter to keep up with new posts!


Thursday, April 5, 2012

Gardening DIY: Making a Watering Can

 You can use an old laundry detergent container to make a great watering can for your container garden. I found this idea on Pinterest, along with other ideas using other types of containers (for instance, milk jugs). I decided to go with the laundry detergent container option because the container seems much sturdier to me, and will hold a large amount of water.

Before beginning, make sure your laundry detergent container is very well cleaned out. You don't want it to smell like detergent anymore. Also, you'll probably want to remove the pouring spout from the container. I didn't because it makes it easier to add water to the bottom of the self-watering planters, but it messes a bit with the water flow. The detergent bottle I used came from Sam's Club, so it's a really large size, which I like for this project.

There are two levels of this project. The first level is the functional watering can. The second level is the aesthetic upgrade. I wanted my watering can to look a bit less like clorox and blend in more - you could paint yours in any color or design you like, or don't paint it at all! Your choice.

This is a free DIY project if you don't pretty-up the watering can: the laundry detergent container was headed for the recycling anyways. If you spend a bit of cash on the extras, it's still only a few dollars - I spent $6, total. 

How to Make a Watering Can
What you'll need:
Old laundry detergent container, well cleaned out
X-acto knife
Drill with small bit OR hammer and small nail
Optional:
plastic spray paint (like Krylon fusion)
Twine (I used jute)
Scissors

Directions:
1. Cut a small hole in the handle of the detergent container. This is necessary to vent air so the watering can pours smoothly.

2. Drill or poke small holes in the top of the detergent lid. (Set the lid on something you don't mind destroying to protect your table surface, like an old magazine.) I used a 1/16th inch drill bit; the size, number and distribution of the holes is up to you.  I made many small holes because I was trying to create a gentle shower effect.  Now you have a functional watering can! You can stop here, or continue. 

3. Spray paint the bottle and cap (separately).  You'll need to use a plastic-bonding spray paint to do this. I used Krylon Fusion. (Be sure to follow the paint can directions for this part.)
 4. Once the paint is fully dry - I waited overnight - use twine to wrap the handle and cap - the parts of the can you will be gripping. I did this to make it easier to use the watering can when wet, and to prevent wear marks on the spray paint. I used a simple half-hitch wrap, as described here*, with about 8 feet of twine for the handle. I used the same technique to wrap the cap.  You could also use glue to attach the twine.
 *That link is to a forum for zombie apocalypse preparedness enthusiasts, as far as I can tell. In any case, the tutorial is good. 

A close-up of the handle wrap:
And that's it! Of course, you could decorate or customize your watering can differently. Have fun with it!


Wednesday, April 4, 2012

Gardening: Seed Starting

 Even though the weather is unseasonably warm, our container gardening plans continue only a bit ahead of schedule.  We have kale and spinach sprouting outside:
Along with the oregano and thyme we picked up this past weekend.  If the temperatures start to get really cold all of the sudden (if the weather wakes up and returns to normal March weather), we can easily move these containers indoors. But for now, they're getting started outside!

The robins I mentioned earlier this week seem to have finally given up building their nest on our deck lamp - I sprayed it with some disinfectant, and maybe the smell scared them off? Or maybe they found somewhere else to build their nest, where it would actually stay put. I'll be scrubbing the lamp down this weekend if they've stayed away. It's pretty messy, but I didn't see the point in making it shine if they were just going to return the next day. I've been cleaning the deck and railing almost daily already.

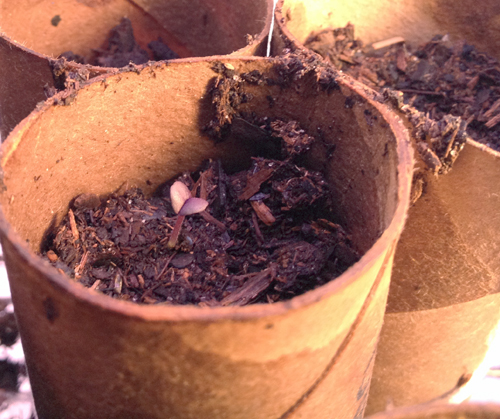
Indoors, we're starting our seeds in toilet paper tubes, like I mentioned in our gardening budget post. The cardboard can either be peeled away or will decompose when these are planted. So far, they are working great. We have a few tomato and basil plants starting!  Here is the dark opal basil sprout - it's purple!

How To Make Toilet Paper Tube Seed Starters 
 You will need:
Cardboard tubes
Twine or string
Drip tray or plate
Permanent marker
Potting soil or seed starting mix
Water
Seeds

Directions:
1. Collect however many toilet paper tubes you would like to use. You might also be able to cut up paper towel or wrapping paper tubes.
2. Write the name of the seed you are planting on the side of the tube in permanent marker (it will get wet!). Use your twine to tie the tubes together in bunches of 3 or so, with the labeled sides facing out. Arrange the tubes standing up on a drip tray.
3. Fill each tube with moistened potting soil to within 1/2 inch or so of the top.
4. Plant the appropriate seed in each tube. You can use one or two seeds per tube, but you ultimately only want one plant - if two sprout, you'll just pull one.
5. Water the tubes daily (use a spray bottle if you have it).  Keep the soil moist, and soon you will see sprouts starting! Move the seedlings to a sunny windowsill or a grow light.  Continue watering regularly until the plants are the size you want for transplant, or the risk of frost is sufficiently past.

We haven't transplanted these outdoors yet (of course), but I don't think they'll give us any trouble when we do. Make sure you label your plants - I wrote on the tubes, but you can use plant markers if you like. Seedlings are quite hard to tell apart!

Like what you read? Subscribe to the feed in your favorite feed reader, or follow me on Twitter to keep up with new posts!

Tuesday, April 3, 2012

Tips and Techniques: Peanut Butter Cups

This past winter, I was lucky enough to spend a few days down in Florida. And let me tell you, a few days of sun can do a girl a world of good!  While there, we visited a candy shop and I couldn't pass up this massive peanut butter cup. It was the size of my fist. And I enjoyed every bite!

Giant pb cup

With Easter approaching, and Reese's PB eggs on my mind, I settled in to recreate this treat in a more reasonable size.   

Homemade peanut butter cups are something that's so simple, it's almost un-intuitive. I hadn't even considered making a home-made version before consuming that monstrosity, but I realized that it was probably just as easy as it seemed - and it was. Anyone can make these! The process is simple, the flavor is customizable, and the end result is more than worth the effort.

The only tricky thing here is figuring out what to make the cups in - what can you use as a mold? I found mini silicone cupcake molds at a kitchen supply store.  They hold about 1 tbsp volume each.  (Which raises the question: who would make/eat cupcakes that tiny? It's almost cruel!) You could also use mini paper cups from the baking supply section of your store, or use regular cupcake papers for mega-peanut butter cups!

I filled my candies with Justin's honey almond butter - I would recommend using any sweetened nut butter. If you're starting with store-bought peanut butter, sweeten it with a bit of sugar or honey until it tastes good to you. I used semi-sweet chocolate chips here, but feel free to use dark, milk, white, or whatever kind you like.

How to Make Home Made Peanut Butter Cups
Of course, these don't have to be peanut butter - mine were almond butter! Use any nut butter you like. 
Yield: 12 candies

What you'll need:
1 cup chocolate chips
6 tbsp or so nut butter, any variety, preferably sweetened
12 mini molds
Microwave-safe bowl for melting chocolate
Teaspoon

Directions:
1. Melt half of the chocolate chips in a microwave-safe container. Spoon about 1/2 tsp chocolate into each mold, and use your finger to spread it up the sides of the mold a bit.
2. Let the molds sit long enough for the chocolate to dry. (Put them in the fridge to speed up this process.)
3. Place a rounded teaspoon of nut butter in the center of each mold.
4. Melt the remaining chocolate chips in the same container as before, and top off the molds with chocolate. Gently tap the mold on the counter if you suspect air bubbles are trapped, so the chocolate settles around the nut butter.
5. Let the chocolate fully solidify (again, you can use the refrigerator to make this go faster). Remove molds, and consume candies!


Tomorrow, it's back to gardening topics - I want to talk to you about our seed starting efforts, and other garden progress!

Like what you read? Subscribe to the feed in your favorite feed reader, or follow me on Twitter to keep up with new posts!

Monday, April 2, 2012

Meatless Mondays: Cucumber and Peanut Salad

For Meatless Mondays, I usually try to feature a main-course type dish that's either vegetarian or vegan. Today, I'm going to break with that convention a bit, because I want to share this salad with you. It's more of a side than a main course, but would work well paired with a soup.  It's quick and simple to prepare, and the flavors meld beautifully: sweet cucumbers with licorice-y fennel and crunchy roasted peanuts.

Salads like this are essential spring and summer dishes for me. Simple vegetables, served cold, are the perfect complement to sweltering evenings. It always amazes me how a few unassuming ingredients can combine into something so delicious. 

The recipe uses salt to draw out some of the water of the cucumbers. Don't worry, this salad isn't very salty - you will rinse the salt off of the cucumbers before combining them with the other ingredients.

You might notice that there are some pretty little herb plants sitting behind this salad. I saw them at the grocery this weekend and couldn't resist - at less than $3 each, these thyme and oregano plants were an easy addition to our gardening plans.

This recipe is vegan-possible: some vegans don't consume honey, but agave nectar or another sweetener can easily be substituted.

Cucumber and Peanut Salad
I call for persian cucumbers here, which are smaller and sweeter than regular cucumbers and seedless. Feel free to substitute regular cucumbers if you cannot find the persian variety; whether or not you remove the seeds is up to personal preference. 
Yield: 6 side-dish servings

INGREDIENTS
6 persian cucumbers (about 4 cups chopped)
2 tsp salt
1 tbsp honey
Zest and juice of one lemon
1 1/2 tsp white wine vinegar
1 tbsp extra virgin olive oil
2 tsp fennel seeds
2/3 cup roasted peanuts, crushed

DIRECTIONS
1. Slice the cucumbers into half-moon shapes, about 1/4 inch thick. Place in a colander and toss with the salt. Place the colander in the sink, and let sit for 15 minutes.
2. While the cucumbers sit, combine honey, lemon zest and juice, and vinegar in a small bowl and whisk to combine. To crush peanuts, place in a zip-top baggie and roll with a rolling pin a few times.
3. Rinse the cucumbers thoroughly, and drain well. Place in a mixing bowl. 
4. Heat a skillet over medium-low heat. Add oil and fennel seeds, and cook, stirring constantly, about 1 minute. Pour this hot oil over the cucumbers, and toss to combine.
5. Add lemon dressing and toss again. Stir in the peanuts shortly before serving.

In other somewhat-related-to-gardening news, we're having trouble with a few birds trying to build a nest on our deck - on top of a light that is far too small, so their nests keep falling apart, covering our deck in mud and sticks. I'm not sure how to convince them to give it up, because it's clearly a poor choice of location, but I'm getting tired of cleaning up after them constantly! I think they're robins. Any ideas?

Like what you read? Subscribe to the feed in your favorite feed reader, or follow me on Twitter to keep up with new posts!

ShareThis

Related Posts Plugin for WordPress, Blogger...