Showing posts with label seeds. Show all posts

Wednesday, April 4, 2012

Gardening: Seed Starting

 Even though the weather is unseasonably warm, our container gardening plans continue only a bit ahead of schedule.  We have kale and spinach sprouting outside:
Along with the oregano and thyme we picked up this past weekend.  If the temperatures start to get really cold all of the sudden (if the weather wakes up and returns to normal March weather), we can easily move these containers indoors. But for now, they're getting started outside!

The robins I mentioned earlier this week seem to have finally given up building their nest on our deck lamp - I sprayed it with some disinfectant, and maybe the smell scared them off? Or maybe they found somewhere else to build their nest, where it would actually stay put. I'll be scrubbing the lamp down this weekend if they've stayed away. It's pretty messy, but I didn't see the point in making it shine if they were just going to return the next day. I've been cleaning the deck and railing almost daily already.

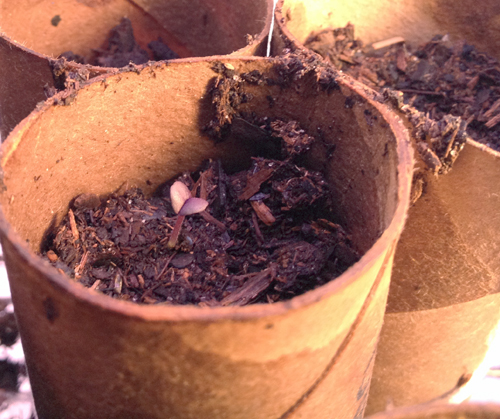
Indoors, we're starting our seeds in toilet paper tubes, like I mentioned in our gardening budget post. The cardboard can either be peeled away or will decompose when these are planted. So far, they are working great. We have a few tomato and basil plants starting!  Here is the dark opal basil sprout - it's purple!
How To Make Toilet Paper Tube Seed Starters 
 You will need:
Cardboard tubes
Twine or string
Drip tray or plate
Permanent marker
Potting soil or seed starting mix
Water
Seeds

Directions:
1. Collect however many toilet paper tubes you would like to use. You might also be able to cut up paper towel or wrapping paper tubes.
2. Write the name of the seed you are planting on the side of the tube in permanent marker (it will get wet!). Use your twine to tie the tubes together in bunches of 3 or so, with the labeled sides facing out. Arrange the tubes standing up on a drip tray.
3. Fill each tube with moistened potting soil to within 1/2 inch or so of the top.
4. Plant the appropriate seed in each tube. You can use one or two seeds per tube, but you ultimately only want one plant - if two sprout, you'll just pull one.
5. Water the tubes daily (use a spray bottle if you have it).  Keep the soil moist, and soon you will see sprouts starting! Move the seedlings to a sunny windowsill or a grow light.  Continue watering regularly until the plants are the size you want for transplant, or the risk of frost is sufficiently past.

We haven't transplanted these outdoors yet (of course), but I don't think they'll give us any trouble when we do. Make sure you label your plants - I wrote on the tubes, but you can use plant markers if you like. Seedlings are quite hard to tell apart!
Like what you read? Subscribe to the feed in your favorite feed reader, or follow me on Twitter to keep up with new posts!

Tuesday, March 27, 2012

Container Gardening: The Plan, Part I


Spring has definitely sprung here in Nebraska. Most of the trees are flowering now, and petals fill the air when the wind gusts. The beautiful change in scenery - vibrant green grass, blossoms all around - has livened up my morning walks with Cooper.

As warmer weather approaches, we’re gathering supplies and getting ready to start some seeds for our container garden. Working with a small space means we have to plan everything very carefully so it will all fit. Here’s what we’re looking at so far.

The Seed List
Seed packets
We will be planting, and attempting to cultivate, all of the following. A few of these have gotten a head start or trial run on our windowsill garden. Most of these specific plants and varieties were selected because they are supposed to perform well in container gardens.

Herbs:
- Basil (sweet Italian, fino verde, cinnamon, lemon, and dark purple opal varieties)
- Dill
- Mint
- Parsley
- Cilantro
- Chives

Lettuces:
- Rainbow Swiss Chard
- Spinach
- Tom Thumb lettuce
- Buttercrunch lettuce
- Blue Curled Scotch Kale

Other vegetables:
- Black Krim tomatoes
- Bush beans (Contender and Royal Burgundy varieties)
- Ronde de Nice zucchini
- Pattypan/Golden Scalloped squash
- Danvers Half-Long carrots
- Nutri-Red carrots
- Little Fingers eggplant
- Red Belgian peppers (sweet)

The Space


That is a LOT of things to try to grow on one tiny deck! The space we plan to use on our deck is 4 feet by 5 feet. (The whole deck is about 13 feet by 5 feet, and houses a grill and a small table.) We’re trying to make the most of the space in a few ways. First, we’re using straight-sided containers for the largest plants (more on that in Part II). Second, we’re using a wire shelving unit to make use of vertical space to grow lettuces and herbs. Third, we invested in a few railing planters to further use all available space. (Most railing planters won’t work on our deck, because it has thin metal rails rather than a thick wooden rail, so it took some searching and splurging to obtain these.)

The other challenge that our deck presents is that it is covered. This means it does not get tons of direct sunlight. In the morning, it gets direct sun from the east, but overhead sun doesn’t happen. This will undoubtedly affect some of the plants more than others, and is part of the reason this year is so experimental. Some plants just might not like living on our deck.  The plants that need the most sun will go along the railing, where they will get the most light, and more shade-tolerant plants will live on other parts of the deck.

Next time, in The Plan, Part II, we’ll discuss containers and soil. 

Like what you read? Subscribe to the feed in your favorite feed reader, or follow me on Twitter to keep up with new posts!

Thursday, January 26, 2012

Our Windowsill Garden

Sprouts


I know what you're probably thinking. "Um, Grace, it's January. Isn't a gardening post a bit out-of-season?" Especially if you consider that I live in Nebraska, and the ground is pretty much frozen solid right now. But give me a second here: we're not talking about dig-up-the-backyard-gardening, we're talking about windowsill gardening. In containers. Indoors.

I mentioned that we hope to start a container garden outdoors on our deck once the weather warms up, but freezing temps haven't put a stop to our culinary cultivation.  There are a handful of things that can easily grow on a sunny windowsill.

Now, I'm NOT an expert at gardening. In fact, I'm a total novice. We're just starting this experiment ourselves! But I thought I would let you know what we're doing, how it's going, and see if anyone out there has some sage advice (get it?!? HA!) for us.

Things that are going well so far: Sprouts!
First harvest
Although we started out with some properly purchased packets of seeds, dirt, and even a few ceramic flowerpots, I decided to wing it completely with one of our containers. I took a handful of mung beans, which had been purchased in the bulk bins at Whole Foods, soaked them in water, and stuck them in dirt in a re-purposed (extra large) yogurt container (with holes punched in the bottom, because plants like that sort of thing). I didn't even bother really giving them enough space, because I had little confidence in the success of this experiment. But wouldn't you know it, these have been some of our most prolific producers! It took them a bit to get started, but now they've taken off. I can harvest a handful of sprouts once or twice a week - and I plan to put a few more beans in the dirt soon so our supply becomes continual. 

Speaking of sprouts, we've also had luck with broccoli sprouts. I'm trying to get some lettuce sprouts to develop a bit more into micro greens, but they're all growing well at this point. 

Broc and mesclun sprouts

My swiss chard babies are just to the point I think I need to thin them. If I can get a few to develop, we can eat them while they're small, then dedicate the whole pot to one (hopefully thriving) plant.  Apparently, you can harvest the outer leaves of the mature plant, while the inner leaves develop, creating a steady chard supply.

Parsley has done well for us - not even kicking it when we accidentally abandoned it for almost two weeks (we were home for the holidays! Oops!).  But our cilantro hasn't sprouted yet. I'm starting to have doubts about it. 

In the "requires patience" department, we have one (single, solitary, uno) chive that has sprouted. It looks quite healthy, if a bit lonely. Hopefully a few more spring up here soon! Our Tom Thumb lettuce seeds show signs of germination, but no sprouts yet. 

Chive

Come spring, we'll be starting some seeds indoors, then setting up a container garden on our deck. I'm hopeful we can get some herbs to grow. I've also purchased an ambitious variety of other seeds - if only a few other plants really produce for us, I'll be happy.  I figure, because this is our first year, experimentation is the name of the game. Give a variety of things a try, and figure out what will actually grow for us. 

Seed packets

My [admittedly ambitious] Seed List: 
  • Herbs: 5 (FIVE) kinds of basil, cilantro, mint, dill, parsley, chives
  • Lettuces: Kale, spinach, swiss chard, butter lettuce, tom thumb lettuce
  • 2 kinds of bush beans
  • Black Krim tomatoes
  • Squash: patty pan squash, and "ronde de nice" zucchini
  • 2 kinds of carrots
  • "Little Fingers" eggplant (tiny eggplants!!!)
  • Belgian (sweet) red peppers

Overkill? Probably. But if even half of it grows well, I'll be pleased as punch.
I've been using this book: (Grow Great Grub: Organic Gardening For Small Spaces, by Gayla Trail) for guidance in container growing. It's very clear and thorough, and I'll let you know how the advice pans out for us as the experiment continues! 

Like what you read? Subscribe to the feed in your favorite feed reader, or follow me on Twitter to keep up with new posts!

ShareThis

Related Posts Plugin for WordPress, Blogger...