You can use an old laundry detergent container to make a great watering can for your container garden. I found this idea on Pinterest, along with other ideas using other types of containers (for instance, milk jugs). I decided to go with the laundry detergent container option because the container seems much sturdier to me, and will hold a large amount of water.
Before beginning, make sure your laundry detergent container is very well cleaned out. You don't want it to smell like detergent anymore. Also, you'll probably want to remove the pouring spout from the container. I didn't because it makes it easier to add water to the bottom of the self-watering planters, but it messes a bit with the water flow. The detergent bottle I used came from Sam's Club, so it's a really large size, which I like for this project.
There are two levels of this project. The first level is the functional watering can. The second level is the aesthetic upgrade. I wanted my watering can to look a bit less like clorox and blend in more - you could paint yours in any color or design you like, or don't paint it at all! Your choice.
This is a free DIY project if you don't pretty-up the watering can: the laundry detergent container was headed for the recycling anyways. If you spend a bit of cash on the extras, it's still only a few dollars - I spent $6, total.
How to Make a Watering Can
What you'll need:
Old laundry detergent container, well cleaned out
X-acto knife
Drill with small bit OR hammer and small nail
Optional:
plastic spray paint (like Krylon fusion)
Twine (I used jute)
Scissors
Directions:
1. Cut a small hole in the handle of the detergent container. This is necessary to vent air so the watering can pours smoothly.
2. Drill or poke small holes in the top of the detergent lid. (Set the lid on something you don't mind destroying to protect your table surface, like an old magazine.) I used a 1/16th inch drill bit; the size, number and distribution of the holes is up to you. I made many small holes because I was trying to create a gentle shower effect. Now you have a functional watering can! You can stop here, or continue.
3. Spray paint the bottle and cap (separately). You'll need to use a plastic-bonding spray paint to do this. I used Krylon Fusion. (Be sure to follow the paint can directions for this part.)
4. Once the paint is fully dry - I waited overnight - use twine to wrap the handle and cap - the parts of the can you will be gripping. I did this to make it easier to use the watering can when wet, and to prevent wear marks on the spray paint. I used a simple half-hitch wrap, as described here*, with about 8 feet of twine for the handle. I used the same technique to wrap the cap. You could also use glue to attach the twine.
*That link is to a forum for zombie apocalypse preparedness
enthusiasts, as far as I can tell. In any case, the tutorial is good.
A close-up of the handle wrap:
And that's it! Of course, you could decorate or customize your watering can differently. Have fun with it!
Showing posts with label diy. Show all posts
Thursday, April 5, 2012
Wednesday, April 4, 2012
Gardening: Seed Starting
Even though the weather is unseasonably warm, our container gardening plans continue only a bit ahead of schedule. We have kale and spinach sprouting outside:
Along with the oregano and thyme we picked up this past weekend. If the temperatures start to get really cold all of the sudden (if the weather wakes up and returns to normal March weather), we can easily move these containers indoors. But for now, they're getting started outside!
The robins I mentioned earlier this week seem to have finally given up building their nest on our deck lamp - I sprayed it with some disinfectant, and maybe the smell scared them off? Or maybe they found somewhere else to build their nest, where it would actually stay put. I'll be scrubbing the lamp down this weekend if they've stayed away. It's pretty messy, but I didn't see the point in making it shine if they were just going to return the next day. I've been cleaning the deck and railing almost daily already.
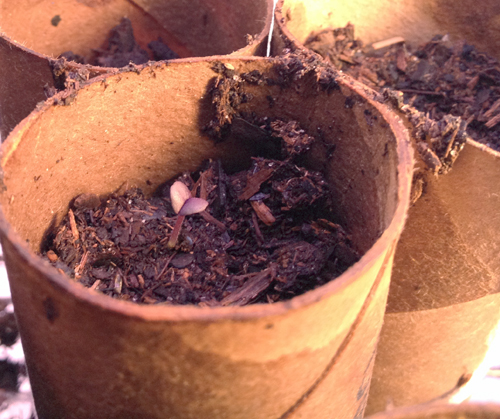
Indoors, we're starting our seeds in toilet paper tubes, like I mentioned in our gardening budget post. The cardboard can either be peeled away or will decompose when these are planted. So far, they are working great. We have a few tomato and basil plants starting! Here is the dark opal basil sprout - it's purple!
How To Make Toilet Paper Tube Seed Starters
You will need:
Cardboard tubes
Twine or string
Drip tray or plate
Permanent marker
Potting soil or seed starting mix
Water
Seeds
Directions:
1. Collect however many toilet paper tubes you would like to use. You might also be able to cut up paper towel or wrapping paper tubes.
2. Write the name of the seed you are planting on the side of the tube in permanent marker (it will get wet!). Use your twine to tie the tubes together in bunches of 3 or so, with the labeled sides facing out. Arrange the tubes standing up on a drip tray.
3. Fill each tube with moistened potting soil to within 1/2 inch or so of the top.
4. Plant the appropriate seed in each tube. You can use one or two seeds per tube, but you ultimately only want one plant - if two sprout, you'll just pull one.
5. Water the tubes daily (use a spray bottle if you have it). Keep the soil moist, and soon you will see sprouts starting! Move the seedlings to a sunny windowsill or a grow light. Continue watering regularly until the plants are the size you want for transplant, or the risk of frost is sufficiently past.
We haven't transplanted these outdoors yet (of course), but I don't think they'll give us any trouble when we do. Make sure you label your plants - I wrote on the tubes, but you can use plant markers if you like. Seedlings are quite hard to tell apart!
Along with the oregano and thyme we picked up this past weekend. If the temperatures start to get really cold all of the sudden (if the weather wakes up and returns to normal March weather), we can easily move these containers indoors. But for now, they're getting started outside!
The robins I mentioned earlier this week seem to have finally given up building their nest on our deck lamp - I sprayed it with some disinfectant, and maybe the smell scared them off? Or maybe they found somewhere else to build their nest, where it would actually stay put. I'll be scrubbing the lamp down this weekend if they've stayed away. It's pretty messy, but I didn't see the point in making it shine if they were just going to return the next day. I've been cleaning the deck and railing almost daily already.
Indoors, we're starting our seeds in toilet paper tubes, like I mentioned in our gardening budget post. The cardboard can either be peeled away or will decompose when these are planted. So far, they are working great. We have a few tomato and basil plants starting! Here is the dark opal basil sprout - it's purple!
How To Make Toilet Paper Tube Seed Starters
You will need:
Cardboard tubes
Twine or string
Drip tray or plate
Permanent marker
Potting soil or seed starting mix
Water
Seeds
Directions:
1. Collect however many toilet paper tubes you would like to use. You might also be able to cut up paper towel or wrapping paper tubes.
2. Write the name of the seed you are planting on the side of the tube in permanent marker (it will get wet!). Use your twine to tie the tubes together in bunches of 3 or so, with the labeled sides facing out. Arrange the tubes standing up on a drip tray.
3. Fill each tube with moistened potting soil to within 1/2 inch or so of the top.
4. Plant the appropriate seed in each tube. You can use one or two seeds per tube, but you ultimately only want one plant - if two sprout, you'll just pull one.
5. Water the tubes daily (use a spray bottle if you have it). Keep the soil moist, and soon you will see sprouts starting! Move the seedlings to a sunny windowsill or a grow light. Continue watering regularly until the plants are the size you want for transplant, or the risk of frost is sufficiently past.
We haven't transplanted these outdoors yet (of course), but I don't think they'll give us any trouble when we do. Make sure you label your plants - I wrote on the tubes, but you can use plant markers if you like. Seedlings are quite hard to tell apart!
Subscribe to:
Posts (Atom)