Even though the weather is unseasonably warm, our container gardening plans continue only a bit ahead of schedule. We have kale and spinach sprouting outside:
Along with the oregano and thyme we picked up this past weekend. If the temperatures start to get really cold all of the sudden (if the weather wakes up and returns to normal March weather), we can easily move these containers indoors. But for now, they're getting started outside!
The robins I mentioned earlier this week seem to have finally given up building their nest on our deck lamp - I sprayed it with some disinfectant, and maybe the smell scared them off? Or maybe they found somewhere else to build their nest, where it would actually stay put. I'll be scrubbing the lamp down this weekend if they've stayed away. It's pretty messy, but I didn't see the point in making it shine if they were just going to return the next day. I've been cleaning the deck and railing almost daily already.
Indoors, we're starting our seeds in toilet paper tubes, like I mentioned in our gardening budget post. The cardboard can either be peeled away or will decompose when these are planted. So far, they are working great. We have a few tomato and basil plants starting! Here is the dark opal basil sprout - it's purple!
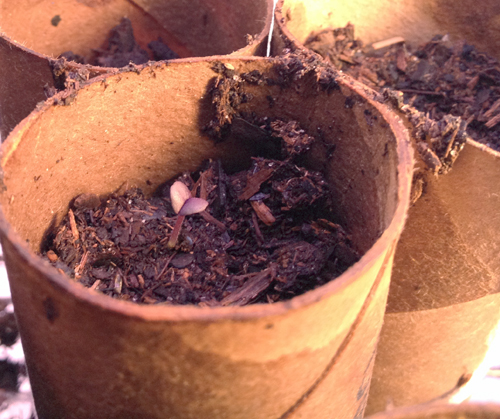
How To Make Toilet Paper Tube Seed Starters
You will need:
Cardboard tubes
Twine or string
Drip tray or plate
Permanent marker
Potting soil or seed starting mix
Water
Seeds
Directions:
1. Collect however many toilet paper tubes you would like to use. You might also be able to cut up paper towel or wrapping paper tubes.
2. Write the name of the seed you are planting on the side of the tube in permanent marker (it will get wet!). Use your twine to tie the tubes together in bunches of 3 or so, with the labeled sides facing out. Arrange the tubes standing up on a drip tray.
3. Fill each tube with moistened potting soil to within 1/2 inch or so of the top.
4. Plant the appropriate seed in each tube. You can use one or two seeds per tube, but you ultimately only want one plant - if two sprout, you'll just pull one.
5. Water the tubes daily (use a spray bottle if you have it). Keep the soil moist, and soon you will see sprouts starting! Move the seedlings to a sunny windowsill or a grow light. Continue watering regularly until the plants are the size you want for transplant, or the risk of frost is sufficiently past.
We haven't transplanted these outdoors yet (of course), but I don't think they'll give us any trouble when we do. Make sure you label your plants - I wrote on the tubes, but you can use plant markers if you like. Seedlings are quite hard to tell apart!
Wednesday, April 4, 2012
Tuesday, April 3, 2012
Tips and Techniques: Peanut Butter Cups
This past winter, I was lucky enough to spend a few days down in Florida. And let me tell you, a few days of sun can do a girl a world of good! While there, we visited a candy shop and I couldn't pass up this massive peanut butter cup. It was the size of my fist. And I enjoyed every bite!
With Easter approaching, and Reese's PB eggs on my mind, I settled in to recreate this treat in a more reasonable size.
Homemade peanut butter cups are something that's so simple, it's almost un-intuitive. I hadn't even considered making a home-made version before consuming that monstrosity, but I realized that it was probably just as easy as it seemed - and it was. Anyone can make these! The process is simple, the flavor is customizable, and the end result is more than worth the effort.
The only tricky thing here is figuring out what to make the cups in - what can you use as a mold? I found mini silicone cupcake molds at a kitchen supply store. They hold about 1 tbsp volume each. (Which raises the question: who would make/eat cupcakes that tiny? It's almost cruel!) You could also use mini paper cups from the baking supply section of your store, or use regular cupcake papers for mega-peanut butter cups!
I filled my candies with Justin's honey almond butter - I would recommend using any sweetened nut butter. If you're starting with store-bought peanut butter, sweeten it with a bit of sugar or honey until it tastes good to you. I used semi-sweet chocolate chips here, but feel free to use dark, milk, white, or whatever kind you like.
How to Make Home Made Peanut Butter Cups
Of course, these don't have to be peanut butter - mine were almond butter! Use any nut butter you like.
Yield: 12 candies
What you'll need:
1 cup chocolate chips
6 tbsp or so nut butter, any variety, preferably sweetened
12 mini molds
Microwave-safe bowl for melting chocolate
Teaspoon
Directions:
1. Melt half of the chocolate chips in a microwave-safe container. Spoon about 1/2 tsp chocolate into each mold, and use your finger to spread it up the sides of the mold a bit.
2. Let the molds sit long enough for the chocolate to dry. (Put them in the fridge to speed up this process.)
3. Place a rounded teaspoon of nut butter in the center of each mold.
4. Melt the remaining chocolate chips in the same container as before, and top off the molds with chocolate. Gently tap the mold on the counter if you suspect air bubbles are trapped, so the chocolate settles around the nut butter.
5. Let the chocolate fully solidify (again, you can use the refrigerator to make this go faster). Remove molds, and consume candies!
Tomorrow, it's back to gardening topics - I want to talk to you about our seed starting efforts, and other garden progress!
With Easter approaching, and Reese's PB eggs on my mind, I settled in to recreate this treat in a more reasonable size.
Homemade peanut butter cups are something that's so simple, it's almost un-intuitive. I hadn't even considered making a home-made version before consuming that monstrosity, but I realized that it was probably just as easy as it seemed - and it was. Anyone can make these! The process is simple, the flavor is customizable, and the end result is more than worth the effort.
The only tricky thing here is figuring out what to make the cups in - what can you use as a mold? I found mini silicone cupcake molds at a kitchen supply store. They hold about 1 tbsp volume each. (Which raises the question: who would make/eat cupcakes that tiny? It's almost cruel!) You could also use mini paper cups from the baking supply section of your store, or use regular cupcake papers for mega-peanut butter cups!
I filled my candies with Justin's honey almond butter - I would recommend using any sweetened nut butter. If you're starting with store-bought peanut butter, sweeten it with a bit of sugar or honey until it tastes good to you. I used semi-sweet chocolate chips here, but feel free to use dark, milk, white, or whatever kind you like.
How to Make Home Made Peanut Butter Cups
Of course, these don't have to be peanut butter - mine were almond butter! Use any nut butter you like.
Yield: 12 candies
What you'll need:
1 cup chocolate chips
6 tbsp or so nut butter, any variety, preferably sweetened
12 mini molds
Microwave-safe bowl for melting chocolate
Teaspoon
Directions:
1. Melt half of the chocolate chips in a microwave-safe container. Spoon about 1/2 tsp chocolate into each mold, and use your finger to spread it up the sides of the mold a bit.
2. Let the molds sit long enough for the chocolate to dry. (Put them in the fridge to speed up this process.)
3. Place a rounded teaspoon of nut butter in the center of each mold.
4. Melt the remaining chocolate chips in the same container as before, and top off the molds with chocolate. Gently tap the mold on the counter if you suspect air bubbles are trapped, so the chocolate settles around the nut butter.
5. Let the chocolate fully solidify (again, you can use the refrigerator to make this go faster). Remove molds, and consume candies!
Tomorrow, it's back to gardening topics - I want to talk to you about our seed starting efforts, and other garden progress!
Labels:
candy,
chocolate,
dessert,
nuts,
peanut butter,
tips and techniques
Monday, April 2, 2012
Meatless Mondays: Cucumber and Peanut Salad
For Meatless Mondays, I usually try to feature a main-course type dish that's either vegetarian or vegan. Today, I'm going to break with that convention a bit, because I want to share this salad with you. It's more of a side than a main course, but would work well paired with a soup. It's quick and simple to prepare, and the flavors meld beautifully: sweet cucumbers with licorice-y fennel and crunchy roasted peanuts.
Salads like this are essential spring and summer dishes for me. Simple vegetables, served cold, are the perfect complement to sweltering evenings. It always amazes me how a few unassuming ingredients can combine into something so delicious.
The recipe uses salt to draw out some of the water of the cucumbers. Don't worry, this salad isn't very salty - you will rinse the salt off of the cucumbers before combining them with the other ingredients.
You might notice that there are some pretty little herb plants sitting behind this salad. I saw them at the grocery this weekend and couldn't resist - at less than $3 each, these thyme and oregano plants were an easy addition to our gardening plans.
This recipe is vegan-possible: some vegans don't consume honey, but agave nectar or another sweetener can easily be substituted.
Cucumber and Peanut Salad
I call for persian cucumbers here, which are smaller and sweeter than regular cucumbers and seedless. Feel free to substitute regular cucumbers if you cannot find the persian variety; whether or not you remove the seeds is up to personal preference.
Yield: 6 side-dish servings
INGREDIENTS
6 persian cucumbers (about 4 cups chopped)
2 tsp salt
1 tbsp honey
Zest and juice of one lemon
1 1/2 tsp white wine vinegar
1 tbsp extra virgin olive oil
2 tsp fennel seeds
2/3 cup roasted peanuts, crushed
DIRECTIONS
1. Slice the cucumbers into half-moon shapes, about 1/4 inch thick. Place in a colander and toss with the salt. Place the colander in the sink, and let sit for 15 minutes.
2. While the cucumbers sit, combine honey, lemon zest and juice, and vinegar in a small bowl and whisk to combine. To crush peanuts, place in a zip-top baggie and roll with a rolling pin a few times.
3. Rinse the cucumbers thoroughly, and drain well. Place in a mixing bowl.
4. Heat a skillet over medium-low heat. Add oil and fennel seeds, and cook, stirring constantly, about 1 minute. Pour this hot oil over the cucumbers, and toss to combine.
5. Add lemon dressing and toss again. Stir in the peanuts shortly before serving.
In other somewhat-related-to-gardening news, we're having trouble with a few birds trying to build a nest on our deck - on top of a light that is far too small, so their nests keep falling apart, covering our deck in mud and sticks. I'm not sure how to convince them to give it up, because it's clearly a poor choice of location, but I'm getting tired of cleaning up after them constantly! I think they're robins. Any ideas?
Salads like this are essential spring and summer dishes for me. Simple vegetables, served cold, are the perfect complement to sweltering evenings. It always amazes me how a few unassuming ingredients can combine into something so delicious.
The recipe uses salt to draw out some of the water of the cucumbers. Don't worry, this salad isn't very salty - you will rinse the salt off of the cucumbers before combining them with the other ingredients.
You might notice that there are some pretty little herb plants sitting behind this salad. I saw them at the grocery this weekend and couldn't resist - at less than $3 each, these thyme and oregano plants were an easy addition to our gardening plans.
This recipe is vegan-possible: some vegans don't consume honey, but agave nectar or another sweetener can easily be substituted.
Cucumber and Peanut Salad
I call for persian cucumbers here, which are smaller and sweeter than regular cucumbers and seedless. Feel free to substitute regular cucumbers if you cannot find the persian variety; whether or not you remove the seeds is up to personal preference.
Yield: 6 side-dish servings
INGREDIENTS
6 persian cucumbers (about 4 cups chopped)
2 tsp salt
1 tbsp honey
Zest and juice of one lemon
1 1/2 tsp white wine vinegar
1 tbsp extra virgin olive oil
2 tsp fennel seeds
2/3 cup roasted peanuts, crushed
DIRECTIONS
1. Slice the cucumbers into half-moon shapes, about 1/4 inch thick. Place in a colander and toss with the salt. Place the colander in the sink, and let sit for 15 minutes.
2. While the cucumbers sit, combine honey, lemon zest and juice, and vinegar in a small bowl and whisk to combine. To crush peanuts, place in a zip-top baggie and roll with a rolling pin a few times.
3. Rinse the cucumbers thoroughly, and drain well. Place in a mixing bowl.
4. Heat a skillet over medium-low heat. Add oil and fennel seeds, and cook, stirring constantly, about 1 minute. Pour this hot oil over the cucumbers, and toss to combine.
5. Add lemon dressing and toss again. Stir in the peanuts shortly before serving.
In other somewhat-related-to-gardening news, we're having trouble with a few birds trying to build a nest on our deck - on top of a light that is far too small, so their nests keep falling apart, covering our deck in mud and sticks. I'm not sure how to convince them to give it up, because it's clearly a poor choice of location, but I'm getting tired of cleaning up after them constantly! I think they're robins. Any ideas?
Labels:
meatless mondays,
salad,
spring,
summer,
vegan,
vegan possible,
vegetable,
vegetarian
Subscribe to:
Posts (Atom)


