Since initially posting this recipe for roasted tri color potatoes, I've found myself making them on an almost weekly basis. They're simple, inexpensive, and satisfying. To make things more interesting, I've tried a few variations - some were successful, others not. I'll start with the misses, then give you the hits.
MISS: soaking the potatoes in beer.
This ended up being a waste of good beer, as neither Nick nor I thought it added any extra flavor. I also didn't notice any difference in texture.
MISS: infusing the oil with garlic
I tried this after seeing the idea in a cook book. While the potatoes soaked in cold water, I put the oil in a skillet over low-medium heat and added two cloves of garlic, thinly sliced. I let it heat until the garlic sizzled and turned golden, then strained out the garlic and just added the oil to the potatoes before cooking. I didn't think it made much difference in the final taste - the garlic was weak at best. I was hoping for something much stronger.
A note about this technique: it's necessary to infuse the oil with garlic, rather than adding garlic to the potatoes and then roasting, because garlic burns so easily. If I minced garlic cloves and cooked them with the potatoes, the potatoes would just taste like burnt garlic, in all probability (full disclosure: I haven't tried this, mostly because I'm so sure the result would be inedible).
HIT: Spice rub
I used this moroccan mint spice rub on the potatoes, and it was delicious. I just stirred the spice rub in with the oil before tossing the potatoes with the oil. I think a lot of other spice rubs would work too - just keep an eye out for things that burn easily, like garlic.
HIT: different shapes
You can cut the potatoes into more traditional "french fry" shapes if you like - it works just as well. Just keep an eye out for the thickness; you need uniform thickness for even cooking. We ate these with elk burgers topped with Roquefort cheese - amazing.
Like what you read? Subscribe to the feed in your
favorite feed reader, or follow me on Twitter to keep up
with new posts! And don't forget
to like me on Facebook!!
Showing posts with label simple. Show all posts
Friday, June 8, 2012
Wednesday, April 18, 2012
Rainbow Carrot Salad
It's been a few days since I posted anything new. I was out of town this past weekend for a family member's funeral, so I didn't have time to cook anything, and frankly didn't feel like cooking anything for a few days. I'm getting back into the swing of things now, and I plan to resume my regular posting. I hope you didn't miss me too much!
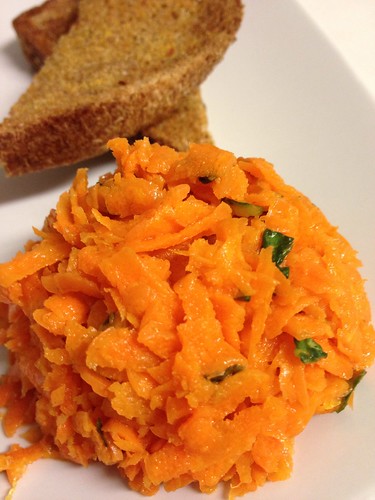
This isn't a new recipe - it's my simple carrot salad, that I posted back in January. Then, it was a great way to bring freshness and sunshine to the dark winter. Now, it's a celebration of springtime. I used parsley instead of basil this time and rainbow carrots in place of regular orange ones. The flavor isn't remarkably different, but it is certainly visually interesting! The beautiful purple carrots have yellow or orange centers, providing a great mix of colors in the salad.
When I found these beautiful rainbow carrots at the store, I knew I had to make something with them that was simple- something that would really showcase the carrots. I considered roasting them (like these carrots and parsnips), but decided that this unfussy, raw salad was more in the spirit of the season.
Rainbow Carrot Salad
This is the same recipe as Simple Carrot Salad, and you can of course make this with regular orange carrots. As before, use any combination of basil, parsley, and mint that you like - whatever you can get fresh.
Yield: about 4 cups, enough to serve 8 as a side dish
INGREDIENTS
4 cups grated rainbow carrots
Zest and juice of one whole lemon
2 tbsp olive oil
1/2 tsp ground coriander
pinch of salt
2 tbsp chopped fresh parsley (or more, to taste)
2 tsp honey
DIRECTIONS
1. Combine all ingredients in a bowl. Stir, cover, and refrigerate for an hour or more.
2. Serve and enjoy! Refrigerate leftovers.
This isn't a new recipe - it's my simple carrot salad, that I posted back in January. Then, it was a great way to bring freshness and sunshine to the dark winter. Now, it's a celebration of springtime. I used parsley instead of basil this time and rainbow carrots in place of regular orange ones. The flavor isn't remarkably different, but it is certainly visually interesting! The beautiful purple carrots have yellow or orange centers, providing a great mix of colors in the salad.
When I found these beautiful rainbow carrots at the store, I knew I had to make something with them that was simple- something that would really showcase the carrots. I considered roasting them (like these carrots and parsnips), but decided that this unfussy, raw salad was more in the spirit of the season.
So, although this isn't a new recipe, it's one worth repeating. And rainbow carrots are a great way to dress it up!
Rainbow Carrot Salad
This is the same recipe as Simple Carrot Salad, and you can of course make this with regular orange carrots. As before, use any combination of basil, parsley, and mint that you like - whatever you can get fresh.
Yield: about 4 cups, enough to serve 8 as a side dish
INGREDIENTS
4 cups grated rainbow carrots
Zest and juice of one whole lemon
2 tbsp olive oil
1/2 tsp ground coriander
pinch of salt
2 tbsp chopped fresh parsley (or more, to taste)
2 tsp honey
DIRECTIONS
1. Combine all ingredients in a bowl. Stir, cover, and refrigerate for an hour or more.
2. Serve and enjoy! Refrigerate leftovers.
Labels:
carrots,
healthy,
salad,
simple,
vegan possible,
vegetarian
Friday, March 9, 2012
Sprouts and Lemon Tahini Dressing
The time had come to clear out some sprouts from our windowsill garden. As I mentioned in that post, I planted some more seeds a few weeks ago, and they have been growing wild ever since! It had gotten to the point that they were starting to choke each other out, fighting for light, so I intervened. With scissors and a salad fork.
This bowl included broccoli sprouts, spinach sprouts, tom thumb lettuce sprouts, swiss chard sprouts, and mezclun micro greens (which the seed packet tells me has 6 kinds of lettuce; I haven't tried to count!).
To top my salad of baby sprouts, I wanted a fresh, spring-like dressing. Something simple, but with big flavor. This lemon-tahini dressing had been lingering in the back of my mind, so I decided to bring it to reality and see if it was as good as I thought it would be. And it was.
The recipe as written produces dressing for a single salad. You could certainly make a larger amount at once if you like. I don't know how well it would refrigerate, but if you make a larger batch, let me know. I like it as a last minute toss-together dressing to finish off a simple salad.
Creamy Lemon Tahini Dressing
Yield: about 1 1/2 tbsp dressing, for one small salad
INGREDIENTS
Juice of 1/4 lemon, about 1 tbsp
2 tsp tahini
1 tsp honey
1/2 tsp coriander
pinch each salt and fresh ground pepper
DIRECTIONS
Combine ingredients in a small bowl and whisk until creamy and smooth. Enjoy over whatever salad you like.
Like what you read? Subscribe to the feed in your favorite feed reader, or follow me on Twitter to keep up with new posts!
This bowl included broccoli sprouts, spinach sprouts, tom thumb lettuce sprouts, swiss chard sprouts, and mezclun micro greens (which the seed packet tells me has 6 kinds of lettuce; I haven't tried to count!).
To top my salad of baby sprouts, I wanted a fresh, spring-like dressing. Something simple, but with big flavor. This lemon-tahini dressing had been lingering in the back of my mind, so I decided to bring it to reality and see if it was as good as I thought it would be. And it was.
The recipe as written produces dressing for a single salad. You could certainly make a larger amount at once if you like. I don't know how well it would refrigerate, but if you make a larger batch, let me know. I like it as a last minute toss-together dressing to finish off a simple salad.
Creamy Lemon Tahini Dressing
Yield: about 1 1/2 tbsp dressing, for one small salad
INGREDIENTS
Juice of 1/4 lemon, about 1 tbsp
2 tsp tahini
1 tsp honey
1/2 tsp coriander
pinch each salt and fresh ground pepper
DIRECTIONS
Combine ingredients in a small bowl and whisk until creamy and smooth. Enjoy over whatever salad you like.
Like what you read? Subscribe to the feed in your favorite feed reader, or follow me on Twitter to keep up with new posts!
Wednesday, March 7, 2012
Simple Pan-Fried Tofu
If you're not looking for a simple base, you can make the tofu the star of the dish by marinating it before cooking. I haven't come up with any particular marinade for you yet, but perhaps that will be a future meatless mondays series post. You may want to lightly salt your tofu slices before frying them, particularly if your sauce isn't very salty.
Although you're using a few tablespoons of oil to cook the tofu, at least half of the oil will remain in the pan, and more of it will drain off onto paper towels. In the end, it's not that much oil per serving, so don't worry! (This is the oil left in the pan - at least a tablespoon, although I didn't measure it.)
This is an easy way to prepare tofu, and quick enough for any night of the week.
Yield: per block of tofu, 2-3 servings
INGREDIENTS
1 block of firm or extra firm tofu
2-3 tbsp olive oil (extra-virgin is fine)
DIRECTIONS
1. Drain the tofu, and use either a clean kitchen towel or paper towels to press out some of the excess water. Slice the tofu to your desired size (I make slices about 1/4 inch thick, about 15 per block of tofu), and lay in a single layer on top of some towels. Cover with another towel, and place a baking sheet with some cookbooks or other somewhat-heavy objects on top. Let sit for 15-30 minutes.
2. Heat a large skillet over medium heat. Add 2 tbsp olive oil and about half of the tofu slices (or whatever fits in your pan). Cook for about 4 minutes on the first side, then flip and cook 2-3 minutes on the second side, until golden brown. (When flipping, be careful not to splash the hot oil.) Set up a plate with some paper towels.
4. If you have remaining tofu to cook, add another few teaspoons to a tablespoon of oil to the pan, and repeat the process.
5. Serve topped with the sauce of your choice.
Like I said, I've been enjoying this with generous amounts of muhammara. I highly recommend it!
Like what you read? Subscribe to the feed in your favorite feed reader, or follow me on Twitter to keep up with new posts!
Saturday, March 3, 2012
Homemade Chocolate Syrup
There are a lot of things that I didn't know I could make at home until I tried. Bread, hummus, and macarons, for example. Each time I try making something I thought I had to buy at the store, I'm surprised how simple it is. How rewarding. And, of course, how much better it tastes!
Now, I don't claim that I invented this recipe or method. If you search for chocolate syrup recipes, you will find many variations. Some of them use as little as 1/2 cup cocoa powder to 2 cups sugar, which I imagine more closely approximates the Hershey's syrup that we're used to. This version, however, is more chocolatey than the store-bought stuff, and consequently tastes much better. Don't get me wrong, it's still really sweet (I can't even imagine how sweet some of these other recipes are!), but the chocolate flavor shines through. I also don't skimp on the vanilla, because vanilla is actually a crucial flavor component in what many of us (myself included) identify as "chocolate".
A word on ingredients: the two main flavors here are your cocoa powder and vanilla extract, so it's important that they are good quality. Use real vanilla, please! I use Trade Joe's cocoa powder, but you can use whatever kind you like best.
If you want to get really foodie with this stuff, you could make a cinnamon version, or a version with chili powder (ancho if you want it mild, some cayenne if you want it spicy! Think Aztec chocolate here), or a mocha version (using instant coffee, or maybe brewed coffee in place of the water). I have not tried any of those yet, but I think a chili version is up next for us.
You can use this chocolate syrup the same way you would use the storebought stuff. A few ideas:
Ice cream sundaes:
A topping for single ingredient "ice cream":
To make chocolate milk (I use 2-3 tbsp per 12 oz glass)
To make hot chocolate (make this the same way as chocolate milk, but then microwave it for a minute or two, and top with some whipped cream and a drizzle of syrup):
And the best part is that it is so very, very simple to make.
Chocolate Syrup
Yield: about 2 cups syrup
INGREDIENTS
1 1/4 cup sugar
1 cup unsweetened cocoa powder
1 cup water
1/4 tsp salt
2 tsp pure vanilla extract
DIRECTIONS
1. In a medium sauce pan, combine sugar and cocoa powder. Stir together, breaking up any clumps of cocoa. Add the water and salt, and stir.
2. Place pan over medium heat. Bring to a boil, and boil for a minute until the mixture thickens slightly. At this point, it will coat the back of your spoon and look like you expect chocolate syrup to look.
3. Remove the pan from the heat. Let it cool about 5 minutes, then stir in the vanilla extract. (If you add the vanilla before it cools, it will evaporate and not flavor your syrup!)
4. Store in an airtight container in the fridge. I use a mason jar, but if you have some kind of squeeze bottle that would probably be ideal.
Saturday, January 7, 2012
Carrot Salad: Bright Flavors in Winter
The past few days have been unseasonably warm here in Nebraska. As in, it was 67 degrees on Thursday afternoon. In JANUARY. But I'm not complaining - I'll take any hint of spring I can to get through winter. Naturally, I went for a run with the pooch outside, to take advantage of the sunny skies!
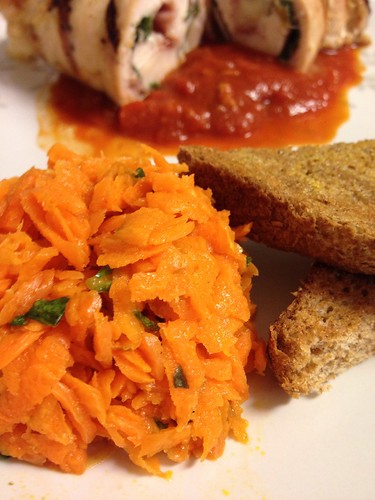
When I came back, we were in the mood for a summer-inspired dinner. Summer cooking for me, though, is about celebrating the bounty of fresh produce that is available. How do we bring those bright, fresh flavors into January? This carrot salad certainly did the trick. And because carrots are pretty much available (cheaply) anytime, you can bring a little summer to January too. We ate this with a chicken and prosciutto involtini that Nick made on the grill - and for once, it was actually comfortable to be outside grilling!
I suppose the lesson I learned from this meal was to really celebrate the small moments - a warm day can be a huge bright spot in an icy winter.
Carrot Salad
I call for fresh basil here, but you could use any combination of basil, parsley, and mint that you like - just use whatever you can get fresh. In the summer time, I might increase the amount of herbs, but here it lends a nice background note to the bright lemon and carrot flavors.
Yield: about 4 cups, enough to serve 8 as a side dish
INGREDIENTS
4 cups grated carrot (about 10 medium carrots)
Zest and juice of one whole lemon
2 tbsp olive oil
1/2 tsp ground coriander
pinch of salt
2 tablespoons chopped fresh basil (or more, to taste)
2 tsp honey
DIRECTIONS
1. Combine all ingredients in a bowl. Stir, cover, and refrigerate for an hour or more.
2. Serve and enjoy! Refrigerate leftovers.
We saw a few sprouts starting in the windowsill garden this morning - hopefully I'll have a few baby plants to show you next week!
When I came back, we were in the mood for a summer-inspired dinner. Summer cooking for me, though, is about celebrating the bounty of fresh produce that is available. How do we bring those bright, fresh flavors into January? This carrot salad certainly did the trick. And because carrots are pretty much available (cheaply) anytime, you can bring a little summer to January too. We ate this with a chicken and prosciutto involtini that Nick made on the grill - and for once, it was actually comfortable to be outside grilling!
I suppose the lesson I learned from this meal was to really celebrate the small moments - a warm day can be a huge bright spot in an icy winter.
Carrot Salad
I call for fresh basil here, but you could use any combination of basil, parsley, and mint that you like - just use whatever you can get fresh. In the summer time, I might increase the amount of herbs, but here it lends a nice background note to the bright lemon and carrot flavors.
Yield: about 4 cups, enough to serve 8 as a side dish
INGREDIENTS
4 cups grated carrot (about 10 medium carrots)
Zest and juice of one whole lemon
2 tbsp olive oil
1/2 tsp ground coriander
pinch of salt
2 tablespoons chopped fresh basil (or more, to taste)
2 tsp honey
DIRECTIONS
1. Combine all ingredients in a bowl. Stir, cover, and refrigerate for an hour or more.
2. Serve and enjoy! Refrigerate leftovers.
We saw a few sprouts starting in the windowsill garden this morning - hopefully I'll have a few baby plants to show you next week!
Friday, December 16, 2011
Simple Avocado Soup
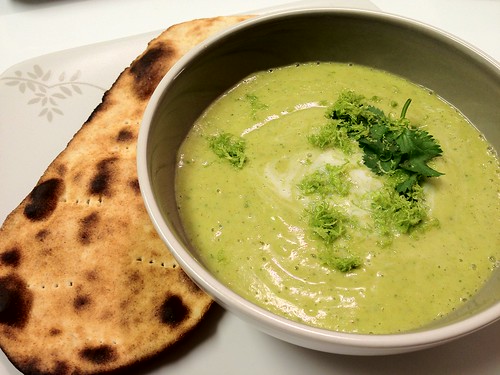
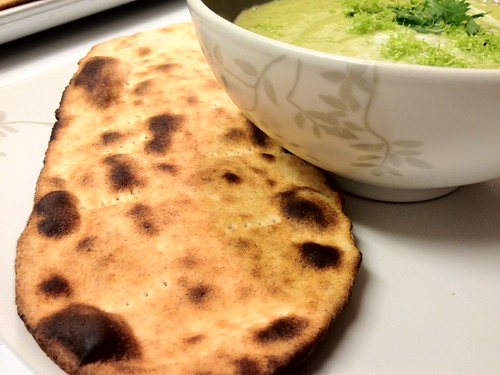
With the rush of the holiday season, cooking at home may seem out of reach. But with this simple cold soup, all you need to do is dump everything in a blender, and a few minutes later dinner is served. The soup is very filling, despite not being hot.
Simple Avocado Soup
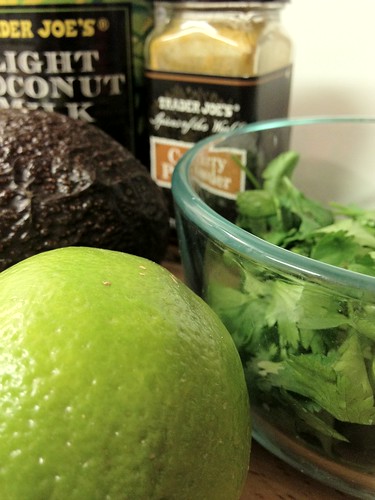
We made this curried, but try substituting lemon for the lime, basil for the cilantro, and a clove of garlic for the curry powder for a lighter flavor. The curry powder we used has a bit of heat to it; if yours is completely mild, you might want to add a pinch (or more) of cayenne.
Serves 2-3.
INGREDIENTS
1 avocado, pit removed and scooped from skin
1 lime, zested and juiced
1 handful cilantro
1 tbsp curry powder
1 cup light coconut milk
1 cup veggie broth
Salt to taste
DIRECTIONS
1. Combine all ingredients except lime zest in a blender. Blend for a minute or two, until the soup is smooth. Taste, and add salt as needed.
2. If you have time, stick it in the fridge for a few minutes to get colder.
3. Serve, topped with lime zest (and a little more cilantro if you like) and with bread for dunking on the side.
We ate this with a failed attempt at naan - the bread tasted great, but the texture was totally wrong - naan should be soft, with crisp spots where the bubbles darken, and these were crispy all over. I'm still trying to find a simple naan recipe that works.
Subscribe to:
Posts (Atom)